

Deciding to add solar to your RV is exciting, but it also brings up a big question: should you do it yourself or hire a professional? This is a project that involves drilling into your roof and working with your electrical system, so it’s important to be realistic about your skills and comfort level. This guide is designed to give you a clear, honest look at how to install solar panels on rv setups from start to finish. By the end, you’ll have a solid understanding of every step, helping you decide if this is a DIY job you can tackle with confidence or if you’d rather have peace of mind by letting our experts at Patriots RV Services handle the installation for you.
Key Takeaways
- Plan Your Power Before You Pay: Before buying any equipment, figure out your daily power usage. Making a list of all your electronics and how much you use them helps you design a system that fits your needs, so you don’t end up with too little power or too much equipment.
- Install with Safety and Sealing in Mind: A successful installation is both safe and leak-proof. Always disconnect all power before you start wiring, and be generous with a quality RV roof sealant around every screw and bracket to prevent electrical mistakes and water damage.
- Connect Your Components in the Right Order: The sequence you wire your system in is critical for protecting your equipment. Always connect the charge controller to your batteries first, before connecting the solar panels, to ensure the system starts up correctly and safely.
Why Go Solar with Your RV?
If you love the freedom of the open road, adding solar panels to your RV is one of the best upgrades you can make. It’s about more than just generating power; it’s about changing how you travel. Imagine camping in remote, beautiful spots without worrying about finding an electrical hookup or listening to a noisy generator all day. Solar power gives you the independence to explore on your own terms, all while saving money and reducing your environmental impact. It’s a powerful combination that makes the RV lifestyle even more rewarding. Whether you’re a weekend warrior or a full-time RVer, a solar setup can completely transform your experience.
Gain Energy Independence for Boondocking
The biggest draw for many RVers is the freedom to camp wherever they want. With a solar setup, you can power your rig without needing to plug into an electric hookup. This is perfect for “boondocking,” or camping off-grid in places without amenities. You can finally visit those remote national forests or serene desert landscapes you’ve been dreaming of. A professionally installed RV solar/off-grid/boondocking system allows you to run your lights, refrigerator, water pump, and charge your devices using only the power of the sun. You get to enjoy true energy independence and the peace and quiet that comes with it.
Save Money in the Long Run
While there is an upfront cost to installing solar panels, they can save you money over time compared to relying on a generator or paid campsites. Think about it: no more buying expensive gas for a generator and fewer nights paying premium fees for electrical hookups. Solar panels are also incredibly durable and require very little maintenance, so you won’t have to worry about constant upkeep costs. It’s a smart investment that pays for itself by reducing your day-to-day travel expenses, leaving more money in your pocket for adventures.
Reduce Your Environmental Footprint
One of the best parts of RVing is connecting with nature, and solar power helps you do that more responsibly. Unlike gas generators that produce fumes and loud noise, solar panels generate clean, quiet energy. Using solar power is a more environmentally friendly way to get the electricity you need. You can enjoy the sounds of nature without the constant drone of a motor in the background, and your campground neighbors will thank you for it, too. It’s a simple way to minimize your impact and preserve the beautiful places you love to visit.
How Much Solar Power Do You Need?
Before you start shopping for panels and batteries, the first and most important step is to figure out exactly how much power you’ll need. This might sound technical, but it’s really just about understanding your own energy habits. Think of it like packing for a trip; you wouldn’t just throw random items in a bag, and the same goes for your power system. Creating a setup that’s too small will leave you in the dark (literally), while a system that’s too big means you’ve spent money on equipment you don’t use. The goal is to find that sweet spot that keeps your lights on and your devices charged without breaking the bank.
By taking the time to map out your power consumption, you can design a solar setup that perfectly matches your travel style, whether you’re a weekend warrior or a full-time boondocker. This process, often called an energy audit, is the foundation of a reliable system. It ensures you have enough juice for everything from your morning coffee to your evening movie. If you’re unsure where to start or want an expert opinion, our team can help you design the perfect RV solar system for your specific needs.
Calculate Your Daily Energy Use
Think of this as creating an “energy budget” for your RV. Start by making a list of every single electronic device you plan to use. This includes everything from your refrigerator and lights to your laptop and coffee maker. Next to each item, write down how many watts it consumes; you can usually find this on the device’s label. If it only lists amps, you can calculate watts by multiplying the amps by the voltage (most RV outlets are 120V). Once you have the wattage for each device, estimate how many hours you’ll use it each day. Multiply the watts by the hours to get your daily watt-hours, then add everything up for a grand total.
Account for Sun Hours and a Power Buffer
Solar panels are rated in watts, but they won’t produce that maximum output all day long. The actual power you generate depends on “sun hours,” which vary based on your location, the season, and daily weather. As a general rule, you can expect a 100-watt solar panel to produce about 350 watt-hours per day. It’s also a smart idea to add a 20% buffer to your total daily energy needs. This extra cushion accounts for cloudy days, unexpected power draws, or times when your panels aren’t getting direct sunlight. This simple step gives you peace of mind and helps ensure you don’t run out of power unexpectedly.
Select the Right Batteries for Your Setup
Your solar panels generate power, but your batteries are what store it for use, especially at night or on overcast days. The size of your battery bank is critical. You’ll want enough storage to cover your daily energy needs for at least a couple of days in case you hit a patch of bad weather. Lithium-ion batteries are a popular choice for RVs because they are lightweight, have a long lifespan, and you can use more of their stored energy before they need a recharge. Your total daily watt-hour calculation will be your guide to choosing a battery bank with the right capacity for your off-grid adventures.
What Tools and Materials Do You Need?
Getting your RV ready for a solar upgrade is a lot like prepping for a big recipe. You need to gather all your ingredients and tools before you start, or you’ll find yourself making extra trips to the store. A solar installation has a few key components, and having everything on hand will make the process much smoother. This project involves working on your RV’s roof and with its electrical system, so it’s a great time to decide if a DIY approach is right for you. If you’re feeling unsure about drilling into your roof or handling the wiring, remember that a professional installation is always an option. Our team specializes in RV solar and off-grid solutions, ensuring your system is installed safely and correctly from the start. But if you’re ready to tackle it yourself, let’s walk through exactly what you’ll need to get the job done.
Choosing Your Solar Panels
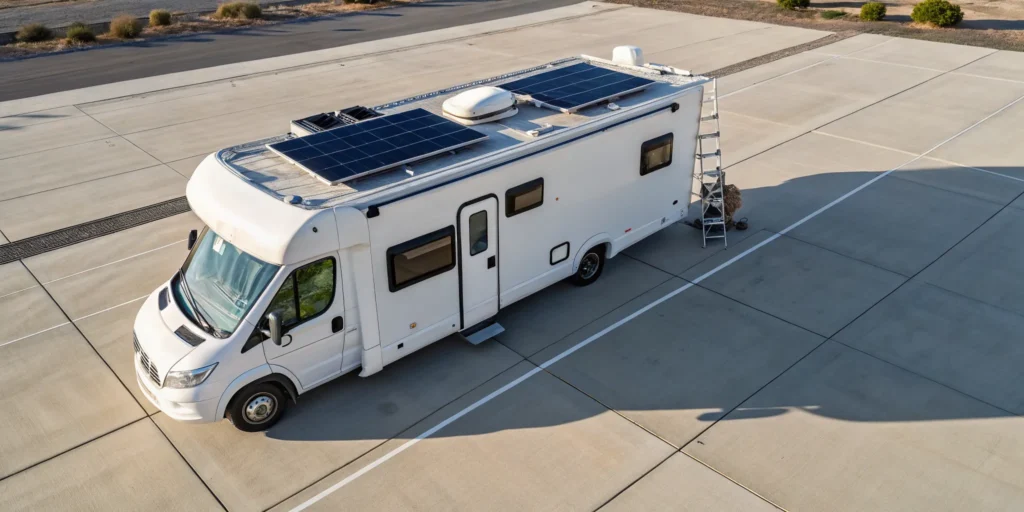
First up are the stars of the show: the solar panels. You’ll generally find two main types for RVs, which are rigid and flexible. Rigid panels are the traditional, sturdy option. They are often more efficient and durable, but they require a flat surface for mounting. Flexible panels are lightweight and can conform to slightly curved roofs, making them a bit more versatile in terms of placement. Take a good look at your RV’s roof to see which type makes the most sense for your space. You want to maximize your sun exposure without creating an awkward or inefficient layout.
Gathering Mounting Hardware and Sealants
Once you’ve picked your panels, you need a secure way to attach them. This is where mounting hardware comes in. These brackets will hold your panels firmly in place, even when you’re cruising down the highway. The most critical part of this step is preventing leaks. Any time you drill into your RV’s roof, you create a potential entry point for water. To avoid this, you’ll need a high-quality, self-leveling sealant designed for RV roofs. Apply a generous amount under each bracket before you screw it down. This step is non-negotiable if you want to avoid future water damage and the need for a major RV roof repair.
Collecting Electrical and Safety Gear
Now for the electrical components that turn sunlight into usable power. This part of the list can seem long, but each piece has an important job. You’ll need a charge controller to protect your batteries from overcharging, an inverter to convert DC power to AC for your household appliances, and deep-cycle batteries to store the energy you collect. You will also need the correct wiring (usually 10 or 8 AWG solar wires), MC4 connectors for the panels, fuses, and circuit breakers for safety. Don’t forget a junction box to keep the roof entry point for your wires clean and waterproof. And most importantly, always wear your safety gear.
How to Mount Your Solar Panels
This is where the project starts to feel real. Mounting the panels is often the most nerve-wracking step, since it involves working on your RV’s roof. But with careful planning and the right technique, you can create a secure, leak-proof setup that will last for years. The goal is to position your panels for maximum sun exposure while ensuring they are anchored firmly to your RV’s structure. It’s all about being methodical. Take your time, measure everything twice, and don’t cut any corners, especially when it comes to sealing. If drilling into your roof feels a bit too permanent or you’d rather just have an expert handle it, our team offers professional RV solar installation to get you powered up without the stress.
Find the Best Spot and Check Your Roof
First things first, head up to your roof and map out your real estate. You’re looking for the largest, flattest areas that get consistent sunlight. Lay your panels out (without mounting them yet) to see how they fit. Pay close attention to anything that could cast a shadow, like your air conditioner, vents, or satellite dish. Even a small shadow can significantly reduce a panel’s output. While you’re up there, give your roof a thorough inspection. If you see any cracks, soft spots, or failing sealant, you’ll need to address those issues first. Adding solar panels to a compromised roof is a recipe for bigger problems, so it’s smart to get any necessary RV roof repairs done before you proceed.
Locate Trusses and Mark Your Mounting Points
To make sure your panels stay put while you’re cruising down the highway, you need to anchor them to your RV’s structural supports, or trusses. Think of these as the bones of your roof. Drilling directly into the roof decking without hitting a truss won’t provide enough strength to hold the panels securely. You can often find trusses by looking for existing screw lines on the roof or by using a good quality stud finder. Once you’ve located them, carefully measure and mark exactly where your mounting brackets will go. This step is all about precision. Taking the time to get your measurements right ensures a solid foundation for your entire system and prevents you from drilling unnecessary holes.
Drill, Mount, and Seal Your Panels
With your spots marked, it’s time to drill. Use a drill bit slightly smaller than your mounting screws to create pilot holes. Before you drive any screws, squeeze a generous amount of a quality, self-leveling lap sealant directly into each hole. This creates a seal from the inside out. After screwing the mounting brackets into place, the real sealing begins. Cover each bracket and screw head completely with sealant. You want to create a waterproof barrier around every single point of penetration. Don’t be shy with it; more is definitely better in this case. This meticulous sealing process is your best defense against leaks and water damage down the road.
How to Wire Your Solar Panels
Now that your panels are securely mounted, it’s time to connect everything. This is where your solar array comes to life. Wiring might sound intimidating, but it’s a matter of connecting the right pieces in the right order. Taking your time here ensures your system will be safe, efficient, and ready to power your adventures. We’ll cover your wiring configuration, getting the cables inside your rig without causing leaks, and connecting the charge controller. If you’re feeling out of your depth, our team is always here to help with professional RV solar/off-grid/boondocking installations.
Connect Panels in Series or Parallel
You have two main options for wiring your panels: in series or in parallel. Connecting in series links your panels in a single chain, which increases the voltage. This is a common choice for RVs and works well in consistent sunlight. Connecting in parallel wires each panel to the charge controller separately. The big advantage here is that if one panel gets shaded, the others keep producing power without interruption. However, this setup increases the electrical current, so you’ll need thicker, more expensive wiring. Your choice depends on your specific setup and how you plan to use your RV.
Run Wires Safely Through the Roof
Getting the wires from the roof into your RV requires careful planning to prevent leaks. The easiest path is through an existing opening, like the refrigerator vent or alongside a plumbing pipe. If you must drill a new hole, choose a spot inside a cabinet to keep the wires hidden. The most important step is to thoroughly seal any new opening with a high-quality, weatherproof sealant to prevent water damage. If you have any doubts about drilling into your roof, it’s best to consult a professional who handles RV roof repair to ensure it’s done right.
Install and Connect the Charge Controller
The charge controller is the brain of your solar system, protecting your batteries from overcharging. Install it as close to your batteries as possible to minimize power loss. Before connecting, use a multimeter to identify the positive and negative wires and label them clearly. This next part is critical: always connect the charge controller to the batteries first, before connecting the solar panels to the charge controller. This sequence prevents damage and ensures a safe startup. This kind of electrical work is a core part of our general RV services and repairs, so don’t hesitate to reach out.
Key Safety Precautions for Installation
Installing a solar system yourself can be incredibly rewarding, but safety should always be your top priority. Working with electrical components on the roof of your RV introduces risks that you need to manage carefully. Taking a few key precautions will not only protect you from injury but also safeguard your RV from damage and ensure your new solar setup works correctly from the start. Think of this as your pre-flight checklist before you power up your system. By focusing on disconnecting power, using the right materials, and testing your work, you can tackle this project with confidence.
Disconnect All Power and Wear Safety Gear
Before you touch a single wire, make sure every power source is completely disconnected. This means shutting off your RV’s main breaker and disconnecting your house batteries. Solar panels can generate a current even in overcast conditions, so it’s a good idea to cover them with a blanket or their original cardboard box until you’re ready to make the final connections. A critical rule for wiring is to always connect the charge controller to the batteries before you connect the solar panels. This prevents the controller from being damaged by unregulated voltage from the panels. And don’t forget your personal safety gear: gloves and safety glasses are a must. If you’re ever unsure, remember that professional RV solar installation is always an option.
Avoid Common Wiring and Mounting Mistakes
Two of the most common DIY mistakes are improper sealing and using the wrong wires. When you drill into your roof to mount the panel brackets, you create a potential entry point for water. To prevent this, apply a generous amount of a compatible, high-quality sealant under and around each bracket and screw. A small leak can lead to big problems, including the need for extensive RV roof repair. Just as important is your wiring. Using wires that are too small for the electrical load can cause them to overheat, create a fire hazard, and significantly reduce your system’s efficiency. Always use the gauge of wire recommended for your specific system components to ensure a safe and effective setup.
Test Every Connection Before Powering On
Once everything is mounted and wired, resist the urge to immediately power it on. First, you need to test your work. Go back and double-check every single connection, giving each wire a gentle tug to make sure it’s secure. Loose connections are a primary cause of system failure and can create dangerous electrical arcs. Next, grab a multimeter to verify your connections. You’ll want to check the polarity (positive and negative) and voltage at each point in the system, from the panels to the charge controller and from the controller to the batteries. This simple step confirms everything is wired correctly and helps you catch any mistakes before they can cause damage. If your tests show an issue you can’t solve, it’s wise to seek out expert RV services and repairs.
How to Connect the Full System
You’ve mounted the panels and run the wires, and now it’s time to connect everything. This is where your separate components become a single, power-generating system. Following the correct order of operations is crucial to protect your equipment and ensure it works properly. If you’re hesitant about the final electrical connections, our team is ready to help with RV solar installations to give you complete peace of mind.
Wire the Charge Controller to the Batteries
This is a critical step, and the order matters. Always connect your charge controller to your batteries first, before you connect the solar panels to the charge controller. This allows the controller to detect the battery’s voltage and configure itself correctly. If you connect the panels first, you risk sending unregulated power that could damage the controller. To minimize power loss, install the charge controller as close to your battery bank as possible. Use the correct gauge wires, ensuring you match the positive and negative terminals.
Add Fuses and Breakers for Protection
Safety is your top priority, and fuses or circuit breakers are non-negotiable for protecting your solar setup. These devices prevent overcurrent situations that could damage your components or even cause a fire. You’ll need to install a fuse or breaker between the solar panels and the charge controller, between the controller and the batteries, and between the batteries and your inverter. Make sure you’re using thick, high-quality wires for all connections. If you’re unsure about any part of this, it’s best to consult a professional for RV services and repairs.
Connect the Inverter and Monitor Performance
The inverter changes DC power from your batteries into AC power for your outlets and appliances. Connect it directly to your battery bank using large, heavy-gauge battery cables, as it can draw significant power. Pay close attention to the positive and negative terminals for a safe connection. Once hooked up, it’s time to see your system in action. Many charge controllers have a built-in screen that displays performance data, confirming everything is working. For more insight, you can install a separate battery monitoring system to track your power usage.
How to Test and Maintain Your Solar Setup
Once your solar panels are installed, the journey isn’t over. Consistent testing and maintenance are what keep your system running efficiently, giving you reliable power on all your adventures. Think of it like any other part of your RV; a little attention goes a long way. A solid maintenance plan has two key parts: regularly testing your system’s performance and keeping the physical components in top shape. Testing involves making sure every part, from the panels to the batteries, is doing its job correctly. This is how you catch small electrical hiccups before they leave you without power. Physical maintenance is just as crucial. Simple tasks like cleaning your panels can make a huge difference in how much energy you generate.
Of course, part of being a smart RV owner is knowing your limits. While many maintenance tasks are easy to handle yourself, some electrical issues are complex and can even be dangerous if you’re not a trained technician. Recognizing when a problem requires professional help is key to keeping your system safe and functional for the long haul. By creating a simple routine for the DIY checks and knowing who to call when you need backup, you can enjoy all the benefits of your RV solar setup with total confidence for years to come.
Test System Performance and Troubleshoot Issues
Getting into the habit of regularly checking your system’s performance will save you from headaches down the road. On a sunny day, make sure your panels are generating power, your batteries are charging, and your inverter is working correctly. A multimeter is a great tool for checking power levels at different points in the system. Visually inspect all your connections, looking for anything loose, corroded, or damaged. Often, issues come from simple things like a shaded panel or a wire that has wiggled loose during travel. A well-maintained system is a reliable one, so make these quick checks part of your pre-trip routine.
Follow a Regular Maintenance Schedule
Keeping your solar panels clean is one of the easiest ways to ensure they produce maximum power. Every few months, or whenever they look dirty, give them a gentle cleaning with water and a soft brush to remove dust, pollen, and other debris. While you’re up there, do a quick visual scan of the panels and mounting hardware to spot any potential issues. This kind of proactive care is a core part of all routine maintenance and helps you catch small problems before they become big ones. It’s also a good practice to plan for a 20% power buffer in your daily use calculations to handle cloudy days or unexpected energy needs.
Know When to Call a Professional
While many maintenance tasks are perfect for a DIY approach, some situations call for an expert. If you’re facing a persistent issue you can’t diagnose, your system isn’t performing as expected, or you have any concerns about the safety of your wiring, it’s time to call a professional. Trying to fix complex electrical problems without the right knowledge can be dangerous and may lead to more expensive repairs. Our team is always here to help with expert diagnostics and service for all kinds of solar and off-grid solutions. Don’t hesitate to reach out for peace of mind.
Related Articles
- RV Solar FAQ
- What Size Solar Panel Do You Need for Your RV Battery
- How Many Watts of Solar Power Does My RV Need
- The Basics of Solar Prep for RV Owners
- RV Solar/Off Grid/Boondocking
Frequently Asked Questions
Can I run my RV’s air conditioner on solar power? This is one of the most common questions, and the short answer is yes, but it requires a very robust system. Running an AC unit demands a significant amount of power, so you would need a large solar array, a substantial lithium battery bank, and a powerful inverter to handle the load. For most people, a starter solar setup is designed to run lights, fans, and electronics, not high-wattage appliances like an air conditioner. If running your AC off-grid is a priority, we can help you design a custom system that has the capacity to handle it.
I’m really worried about drilling holes in my roof. What if I cause a leak? That’s a completely valid concern, and it’s the part of the installation that requires the most care. The key to preventing leaks is meticulous sealing. Using a high-quality, self-leveling lap sealant under and over every single mounting point is not optional, it’s essential. If the thought of drilling into your roof makes you nervous, it’s a good sign that professional installation might be the best route for you. It gives you peace of mind knowing that an experienced technician is handling the most critical step, ensuring your system is secure and your roof remains watertight.
My energy needs change depending on the trip. How do I build a system that’s flexible? That’s a smart way to think about it. You don’t have to build your ultimate dream system all at once. A great approach is to start with a solid foundation that you can expand on later. Invest in a high-quality charge controller and inverter that can handle more power than you currently need. You can begin with just a couple of solar panels and one or two batteries. As you get a better feel for your power consumption or your budget allows, you can easily add more panels or batteries to the existing system without having to start over.
What’s the most common mistake people make when installing their own solar system? Besides improper sealing, the most frequent mistake is using wires that are too small for the job. It’s easy to underestimate how much power is flowing through the system, but using an undersized wire (a higher gauge number) can cause it to overheat, which is a serious fire hazard. It also creates voltage drop, meaning your system becomes less efficient and you lose precious power before it even reaches your batteries. Always follow the recommendations for wire gauge that come with your components; it’s a critical safety step.
How long will my solar panels and batteries last? A solar setup is a long-term investment, and quality components are built to last. Most rigid solar panels come with a warranty of 20 to 25 years and can continue producing power long after that. The lifespan of your batteries depends on the type you choose. Traditional lead-acid batteries might last 3 to 5 years with good care. Lithium batteries, while more expensive upfront, have a much longer lifespan, often lasting for 10 years or more, making them a popular and reliable choice for serious RVers.
Need Professional RV Service in Denton, TX?
Call (940) 488-5047 — Patriots RV Services, your mission-critical RV service center in Denton, TX.