

A Simple Guide to How to Hook Up Solar Panels to RV Batteries
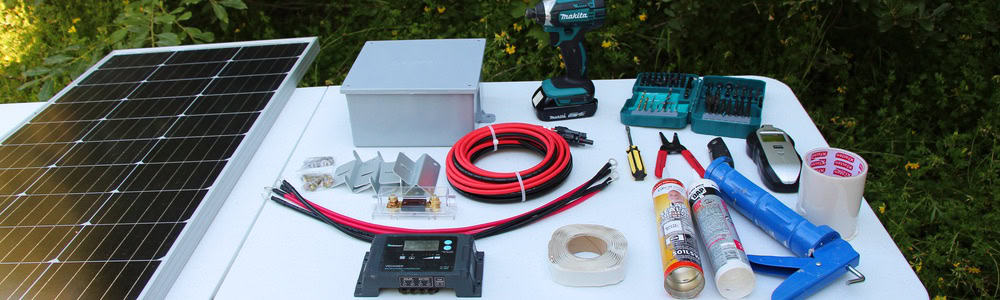
To connect solar panels to your RV’s batteries, start by selecting panels that match your power requirements and available space. Calculate energy needs by listing appliances and their wattage. Install a charge controller and inverter securely. Connect solar panels to batteries using proper cables and connectors. Test the system by measuring voltages and monitoring power flow. Regular maintenance ensures optimal performance and battery lifespan. While you can handle basic installations yourself, complex electrical work may require professional RV service and repair to ensure everything functions safely and efficiently. Mastering these steps establishes a solid foundation for your solar RV setup.
Choosing the Right Solar Panels
When selecting solar panels for your RV, consider the wattage output and size to ensure they meet your energy needs and fit within your space constraints. Higher-wattage panels generate more electricity, making them ideal for larger energy demands. Look for panels with a wattage output that aligns with your RV’s power requirements. Carefully assess the physical dimensions of the panels to make sure they fit the available space on your RV roof or any other mounting location. Compact panels may be preferable for smaller RVs or limited roof space. Remember, the size of the solar panels impacts how much energy they can produce, so choose wisely based on your energy needs and available installation area.
Calculating Your Power Needs
Determining your power needs for your RV solar panel system involves evaluating your daily energy consumption and calculating the wattage necessary to support your electrical devices efficiently. Start by listing all the appliances you plan to power, along with their respective power consumption in watts. Consider the average daily usage for each device and multiply it by the number of hours you use it per day. Add up these values to get your total daily watt-hour consumption. To ensure an uninterrupted power supply, factor in a buffer of around 20% of your total watt-hour consumption for unexpected spikes or inefficiencies. This final figure will help you select the appropriate solar panels, charge controller, and inverter for your RV solar system setup.
Installing Charge Controller and Inverter
To effectively install the charge controller and inverter for your RV solar panel system, make sure that you have accurately assessed your power needs and selected components that match your total daily watt-hour consumption. Start by securely mounting the charge controller and inverter in a well-ventilated area close to your RV batteries. Next, connect the charge controller to the solar panels using the appropriate gauge wiring, ensuring proper polarity. Then attach the charge controller to the RV batteries, following the manufacturer’s guidelines for series or parallel connections. Finally, connect the inverter to the battery bank, ensuring the correct polarity, and test the system to verify proper operation before finalizing the installation.
Connecting Solar Panels to Batteries
Begin by carefully connecting the solar panels to the RV batteries, ensuring a secure and efficient power transfer to meet your off-grid energy needs. Use appropriately sized cables to connect the positive terminal of the solar panel to the positive terminal of the battery, and do the same for the negative terminals. It is vital to maintain polarity consistency to prevent damage to the system. Utilize proper connectors, such as MC4 connectors, to ensure a reliable and weather-resistant connection. Consider incorporating a fuse or breaker in the circuit for safety in case of overcurrent situations. Secure all connections tightly to prevent any loose or intermittent contacts that could lead to inefficiencies or safety hazards.
Testing and Monitoring System
Conduct thorough testing and monitoring of the solar panel’s connection to the RV battery to ensure functionality and efficiency. Utilize a multimeter to measure the voltage output of the solar panels under various lighting conditions. Monitor the charge controller to verify it is regulating the power efficiently and protecting the batteries from overcharging. Check the battery voltage regularly to monitor the charging process and ensure that the batteries are receiving the correct power. Inspect all connections for tightness and signs of wear to prevent any power loss due to poor connections. Regular testing and monitoring of your solar panel system will help maintain peak performance and prolong the life of your RV batteries.
Maintenance Tips for Longevity
Regularly inspecting and maintaining your solar panel system is important for ensuring the longevity and best performance of your RV batteries. Start by cleaning the solar panels with a soft cloth and mild soapy water to remove any dirt or debris that could reduce efficiency. Check the wiring connections for any signs of wear or corrosion, ensuring they are tight and secure. Inspect the charge controller for proper functioning and adjust settings if necessary to optimize charging. Monitor the battery levels regularly and top up water levels in flooded lead-acid batteries as needed. Keep an eye on the overall condition of the system and address any issues promptly to prevent further damage and prolong the lifespan of your RV batteries.
Related Topics: