

Let’s talk about the heart of your off-grid electrical system: your solar panels. While it’s easy to get lost in watts and volts, the decision really comes down to how you plan to use your campervan. Are you a weekend warrior who needs to keep a few devices charged, or a full-timer running a mobile office? Your answer will guide you toward the right size and type of system. We’ll explore the differences between durable rigid panels, low-profile flexible panels, and convenient portable kits to help you find the best solar panels for your campervan. This is your roadmap to creating a dependable power system for your life on the road.
Key Takeaways
- Choose the right panels for your travel style: Figure out your daily power needs first, then select the best panel type for your RV. Rigid panels offer maximum power and durability, flexible panels are great for curved roofs, and portable kits provide convenience for shorter trips.
- Build a complete system for reliable power: Solar panels are just one piece of the puzzle. You also need an efficient MPPT charge controller to protect your batteries, a battery bank large enough to store your energy, and an inverter to run your everyday appliances.
- Protect your investment with proper installation and care: A secure installation is essential for safety and longevity, whether you do it yourself or hire a professional. Simple, regular maintenance like cleaning the panels and checking connections will keep your system running efficiently for years.
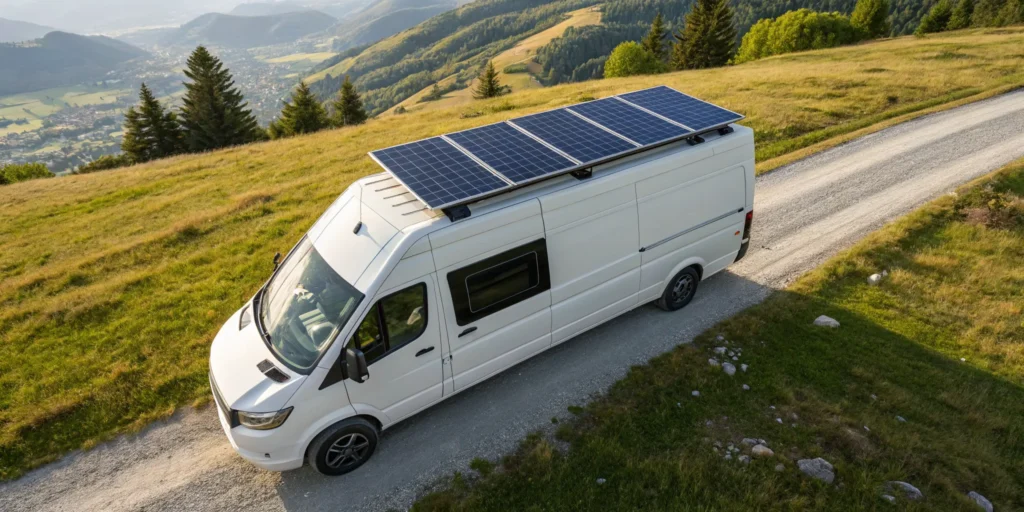
Rigid, Flexible, or Portable: Which Solar Panel is for You?
Choosing the right solar panels is the first big step in your off-grid adventure. The type you pick will depend on your RV’s roof, your power needs, and how you like to travel. There are three main players in the game: rigid, flexible, and portable panels. Each has its own set of pros and cons, and understanding them will help you build the perfect solar setup for your RV. Let’s break down what makes each type unique so you can make a confident choice for your home on wheels.
Rigid Panels: The Powerhouse Option
Rigid panels are the workhorses of the RV solar world and for good reason. They are the most common type you’ll see mounted on RV roofs. Built with a sturdy aluminum frame and a protective tempered glass top, these panels are designed for durability and a long lifespan. Their biggest advantage is efficiency; they convert more sunlight into electricity compared to other types, which is crucial when you have limited roof space. This robust construction also helps them dissipate heat better, which keeps them running efficiently even on hot Texas days. If you’re looking for maximum power and a long-term, reliable solution, rigid panels are almost always the best way to go.
Flexible Panels: For Curved Roofs and Stealth Setups
If you have a curved roof like on an Airstream or want a more low-profile look, flexible panels are an excellent choice. These panels are incredibly thin and lightweight, allowing them to bend and conform to surfaces where a rigid panel just won’t fit. Installation is often simpler since you can use a strong adhesive instead of drilling holes in your roof, which is a big plus for many RV owners. The trade-off is that they are slightly less efficient than their rigid counterparts and can be more susceptible to heat buildup, which can shorten their lifespan. But for stealth camping or unique roof shapes, their versatility is hard to beat.
Portable Kits: Power on the Go
Don’t have the roof space for a permanent installation, or maybe you just aren’t ready to commit? Portable solar panel kits are your best friend. These suitcase-style or foldable panels can be set up on the ground whenever you’re parked, allowing you to chase the sun for optimal charging. This is a huge advantage if you prefer to park your RV in the shade to stay cool. They are perfect for weekend trips or for supplementing a smaller roof-mounted system. Brands like Jackery offer fantastic all-in-one kits that are easy to store and deploy, giving you power right when you need it without any permanent modifications to your rig.
Monocrystalline vs. Polycrystalline: What’s the Difference?
When you’re looking at rigid or flexible panels, you’ll see two main types: monocrystalline and polycrystalline. Here’s the simple breakdown: monocrystalline panels are made from a single, pure silicon crystal, which makes them more efficient. They perform better in low-light conditions and take up less space for the same power output. Polycrystalline panels are made from melted silicon fragments and are slightly less efficient. While they used to be a much cheaper alternative, the price difference has shrunk significantly. For RV life, where space and efficiency are key, we always recommend choosing monocrystalline solar panels. You’ll get more power from your setup, especially on those cloudy days.
How Much Solar Power Do You Really Need?
Figuring out the right size for your solar setup can feel like a tricky puzzle, but it’s the most important step toward reliable off-grid power. There’s no single answer that works for everyone because your ideal system depends entirely on your lifestyle, the appliances you use, and where you plan to travel. Instead of guessing, you can take a methodical approach to find the perfect fit for your RV.
The goal is to build a system that comfortably meets your daily needs without leaving you in the dark on a cloudy day. This means taking a close look at your power consumption and thinking realistically about how and when you’ll be using your campervan. By calculating your energy usage and considering factors like weather and travel style, you can confidently choose a solar array that keeps you powered up for every adventure. If you need help with the math or want a professional opinion, our team offers expert RV solar and off-grid solutions to get you started.
Calculate Your Daily Power Usage
First, you need to conduct a personal “power audit.” Make a list of every single electronic device and appliance you plan to use, from your refrigerator and lights to your laptop and phone charger. Next to each item, write down its power consumption in watts (you can usually find this on the device’s label or with a quick online search). Then, estimate how many hours per day you’ll use each one.
To find your daily energy need in watt-hours (Wh), simply multiply each device’s wattage by its hours of use and add everything together. For example, if you run a 50-watt fridge for 10 hours, that’s 500 Wh. As a general rule, most weekend campers can get by with 750 to 1,000 Wh for essentials like a fridge, fan, and electronics. But if you plan to work from the road or use power-hungry appliances, you’ll need more.
Account for Sunlight and Weather
Solar panels don’t produce their maximum rated power all day long. Their actual output depends on the weather, time of year, and your location. The key metric here is “peak sun hours,” which is the average number of hours per day your panels will receive strong, direct sunlight. In a sunny state like Texas, you might get five or more peak hours in the summer.
Seasons make a huge difference. Because of the sun’s lower angle in the sky, a solar panel that’s 92% effective in the summer might only be 24% effective in the winter. If you plan to camp year-round, you’ll need a larger solar array to capture enough energy during those shorter, darker days. It’s always a good idea to build in a little extra capacity to account for cloudy stretches.
Match Your Solar Array to Your Travel Style
How you use your RV is the final piece of the puzzle. Are you a weekend warrior who mostly stays at campgrounds with electrical hookups, or are you a full-time boondocker exploring remote areas for weeks at a time? Your travel style directly impacts how much you’ll rely on your solar setup.
Someone who only needs to keep their lights on and phone charged will have much smaller needs than a digital nomad running a full mobile office. Think about your typical trip. If you spend most of your time parked in sunny, open areas, you can get by with a smaller system. But if you love camping in shady forests or plan to travel during the winter, you’ll need to design a more robust system to ensure you have consistent power.
Our Favorite Solar Panel Brands for Campervans
Once you know what type of panels you want and how much power you need, it’s time for the fun part: choosing your gear. The market is full of great brands, and picking the right one often comes down to your specific setup, budget, and travel style. Some brands excel at creating all-in-one kits that simplify installation, while others are known for high-performance components that let you build a truly custom system. It’s a bit like choosing between a meal kit subscription and shopping for individual ingredients at a gourmet market. Both can result in a fantastic meal, but the process and control you have are very different.
Deciding which path to take depends on your comfort level with electrical work and your long-term goals. If you’re new to solar, a comprehensive kit can provide peace of mind and get you up and running quickly. If you’re a seasoned RVer with specific power demands, you might prefer to hand-pick each component for maximum efficiency and customization. To help you get started, we’ve put together a list of some of the most trusted and popular solar panel brands we see on campervans. These companies have a proven track record for quality and reliability, making them excellent choices for your off-grid adventures. We’ll walk through what makes each one stand out so you can find the perfect match for your rig.
Top Solar Solutions from Patriots RV Services
Choosing the right solar panels can feel a bit overwhelming with so many options available. It’s not just about the panels; you also have to think about charge controllers, batteries, and inverters. That’s why we recommend starting with a clear plan. Figuring out your daily power usage and sun exposure is the first step. From there, we can help you design the perfect RV solar and off-grid system for your needs. Whether you’re looking for a simple setup for weekend trips or a robust system for full-time boondocking, our team has the expertise to guide you through every component.
Renogy: Complete Solar Kits
Renogy is a fantastic starting point for many RVers because they specialize in complete solar kits. These packages take the guesswork out of the equation by bundling everything you need, including panels, a charge controller, mounting hardware, and cables. Their kits are available with either rigid or flexible panels, giving you options for different roof types. The Renogy 400-Watt RV Kit is a popular all-around choice, offering plenty of power for most campervans. Plus, many of their systems include Bluetooth monitoring, so you can easily check your power status right from your phone.
Victron Energy: High-Performance Systems
If you’re looking for top-tier quality and performance, Victron Energy is a name you’ll hear often. While they are known for their entire line of electrical components, their solar products are exceptionally reliable and efficient. Victron is a favorite among serious off-gridders who want to build a powerful, long-lasting system from the ground up. We recommend pairing their components with monocrystalline solar panels, which are more efficient than polycrystalline types. For a system that you can depend on for years of travel, Victron is a solid investment in your campervan’s electrical setup.
BougeRV: Flexible Panel Choices
For van owners with curved roofs or those who prefer a more discreet, low-profile look, BougeRV is an excellent brand to consider. They are well-known for their lightweight and flexible solar panels. These panels are thin and can bend to fit the contours of your van, making installation much simpler, often without needing to drill into your roof. The BougeRV Yuma 200-Watt Flexible Solar Panel is a great example of a portable and versatile option. Their flexibility makes them easy to store and perfect for anyone who wants a less permanent or “stealth” solar setup.
Jackery: The Best in Portable Power
Jackery is a leader in the world of portable power. Their SolarSaga panels are designed to work seamlessly with their popular portable power stations, creating an easy-to-use, plug-and-play system. This is an ideal solution if you don’t want to install a permanent system on your roof or if you want power you can take with you on tent camping trips, too. While Jackery’s products are known for their high quality and efficiency, their proprietary connections can sometimes make it tricky to expand or upgrade your system with other brands down the road.
What Else Do You Need for a Full Solar Setup?
Picking out your solar panels is a great first step, but it’s only one piece of the puzzle. To get a fully functioning off-grid power system for your RV, you’ll need a few other key components that work together to capture, store, and deliver electricity. Think of it like a team: the panels are the star players, but they can’t win the game without their supporting cast.
You’ll need a charge controller to manage the energy, a battery bank to store it, and an inverter to make it usable for your everyday appliances. Plus, you can’t forget the essential wiring, fuses, and mounting hardware that safely connect everything. Getting these components right is just as important as choosing the perfect panels. A well-matched system ensures you get reliable power, protects your equipment from damage, and keeps you safe on the road. If you’re feeling overwhelmed, our team specializes in complete RV solar and off-grid solutions to get you set up correctly from the start.
Choose Your Charge Controller: PWM vs. MPPT
The charge controller is the brain of your solar setup. It sits between your solar panels and your batteries, regulating the voltage to prevent overcharging and extend your battery’s lifespan. You’ll come across two main types: PWM (Pulse Width Modulation) and MPPT (Maximum Power Point Tracking).
While PWM controllers are less expensive, we always recommend an MPPT charge controller. MPPTs are significantly more efficient, getting up to 30% more power out of your panels. They intelligently match the panel’s output to the battery’s voltage, ensuring you capture every possible watt of sunlight. This extra efficiency means faster charging and more available power, making the higher initial cost a worthwhile investment for any serious RVer.
Size Your Battery Bank and Inverter
Your battery bank is where you’ll store all the energy your panels collect. To figure out how much storage you need, you’ll want to calculate your daily power usage in watt-hours (Wh). For reference, running a fridge, fan, and a few electronics typically requires at least 750 to 1000 Wh. It’s always a good idea to have more capacity than you think you’ll need.
The inverter is another crucial component. It converts the 12V DC power from your batteries into 120V AC power, which is what you need to run household appliances like your microwave or TV. The size of your inverter depends on the total wattage of the AC devices you plan to use at the same time.
Gather Your Wiring, Fuses, and Safety Gear
Connecting your solar system safely is non-negotiable. You’ll need the right cables, fuses, and connectors to handle the electrical load and protect your equipment. For the connection between your panels and charge controller, use a high-quality, outdoor-rated solar cable that is double-insulated to withstand the elements.
Fuses or circuit breakers are also essential safety features. You’ll need one between your solar panels and the charge controller, and another between the controller and your battery bank. These devices protect your system from power surges and short circuits. Getting the wiring and safety components right is critical, which is why many RVers trust professionals for their RV services and repairs.
Select the Right Mounting Hardware
How you attach your panels to your RV is just as important as the panels themselves. A secure installation prevents them from flying off while you’re driving and protects your roof from damage. For rigid panels, many people use plastic corner mounts that can be adhered to the roof with a strong sealant, avoiding the need to drill holes. These mounts also create a small air gap underneath the panel, which helps with cooling and improves efficiency.
Whether you drill or use an adhesive, always use marine-grade hardware and a high-quality, flexible sealant to ensure a durable, weatherproof bond. A poor mounting job can lead to leaks and costly damage, so it’s a good idea to consult an expert in RV roof repair if you have any doubts.
Which Solar Panel Type Fits Your Campervan Best?
Choosing the right solar panels can feel like a big decision, but it really comes down to your RV, your travel style, and your power needs. The three main players on the field are rigid, flexible, and portable panels. Each has its own set of strengths, and one is likely a perfect match for your adventures. Thinking about how you camp, where you park, and how much power you use will point you in the right direction. Let’s break down the options to help you find the best fit for your campervan’s solar setup.
When to Choose Rigid Panels
Rigid panels are the classic, go-to choice for a reason. They are the most efficient and durable option available, built with a sturdy aluminum frame and a protective glass top. This construction helps them withstand the elements and last for decades. Because they generate more power per square foot, they are ideal if you want to maximize energy production on limited roof space. If you’re a full-timer or spend a lot of time off-grid and need a reliable, high-performance system, rigid panels are almost always the best investment. They are the workhorses of the RV solar world, delivering consistent power you can count on.
The Pros and Cons of Flexible Panels
Flexible panels are a fantastic solution for specific situations. Their biggest advantage is their lightweight and low-profile design. If you have a curved roof or want a stealthy look that doesn’t scream “campervan,” these panels are a great choice. Installation is often simpler since you can mount them with a special adhesive, avoiding the need to drill holes in your roof. However, there are trade-offs. Flexible panels are typically less efficient than rigid ones and have a shorter lifespan because they are more susceptible to heat damage and physical wear. They are a great fit for weekend campers or those with unique roof shapes, but they may not be the best primary power source for serious off-grid living.
Why Portable Solar is Great for Weekend Trips
If you’re not ready to commit to a permanent roof installation, portable solar panel kits are your best friend. These suitcase-style systems are perfect for weekend warriors or anyone with smaller power needs. Their main benefit is flexibility. You can park your RV in a shady spot to stay cool while placing your panels in direct sunlight to soak up the rays. They require no installation, so you can start using them right out of the box. While they aren’t designed to power an entire RV setup full-time, they are an excellent way to keep your batteries topped off, run small appliances, and get a feel for solar power without a major commitment.
What Does Solar Panel Installation Involve?
Setting up a solar system on your campervan breaks down into a few key steps. Whether you’re a seasoned DIYer or prefer to leave it to the pros, understanding the process helps you make smart decisions. From mounting the panels to wiring them correctly, each step is crucial for a safe and efficient system that will power your adventures.
Installing a Permanent Roof-Mounted System
This is the most common setup for full-time van lifers. The process starts with planning the panel layout, avoiding vents and fans. Next, you’ll attach mounting brackets, sealing every hole to prevent leaks. Once the mounts are secure, the panels are bolted on. The final step is running wires into your van through a waterproof cable entry gland and connecting them to your charge controller. Getting this right is critical, which is why many RV owners trust a professional solar installation to ensure a secure and weather-tight setup.
Mounting Flexible Panels: Adhesive vs. Hardware
Flexible panels offer a stealthy, low-profile look and are great for curved roofs. You can mount them with a high-strength adhesive or with hardware. Using an adhesive like 3M VHB tape avoids drilling holes in your roof, which is a huge plus. However, this method can trap heat, slightly reducing the panel’s efficiency. Using hardware like screws or bolts (with proper sealing) creates a small air gap underneath. This gap allows for airflow, which helps keep the panel cool and operating more efficiently. The choice comes down to your priorities: a drill-free installation or maximum performance.
Wiring Your Panels: Series vs. Parallel
Once mounted, you have to connect your panels. You can wire them in “series” or “parallel,” and your choice affects performance. Wiring in series (positive to negative) adds up the voltage of your panels, which is great for improving charging efficiency on cloudy days. Wiring in parallel (positive to positive, negative to negative) adds up the amperage. This setup is more resilient to shading, because if one panel is partially covered, the others can still produce power. Many van lifers use a series-parallel connection to get the best of both worlds.
Consider Tilting and Adjustable Mounts
To get the most out of your solar panels, you can install them on tilting mounts. Standard flat-mounted panels are convenient, but they only capture optimal sunlight for a small part of the day. Tilting mounts let you angle your panels directly at the sun as it moves. This simple adjustment can dramatically increase your power generation, especially in the winter when the sun is lower in the sky. While they require a bit more effort to adjust and add some height to your roof, the extra power can be a game-changer for serious off-grid travel.
How Do Weather and Travel Impact Your Solar Power?
Your solar setup isn’t a magic box that produces endless energy. The amount of power you generate is directly tied to your environment, travel habits, and the time of year. A system that works perfectly for a summer trip through sunny Texas might not cut it for a winter adventure in the mountains. Understanding how external factors affect your panels is key to designing a reliable system that won’t leave you in the dark. Thinking ahead about where and when you travel will help you build a setup that truly meets your needs on the road.
Plan for Seasonal Power Changes
The sun’s position in the sky changes dramatically between seasons, and so does your power potential. During the long, sunny days of summer, your panels will soak up plenty of energy. But in the winter, the days are shorter and the sun hangs lower on the horizon, which means less direct sunlight hits your panels. If you plan to camp year-round, you’ll need a larger solar array to capture enough energy during those shorter winter days. For those who stick to summer travels, a smaller, more streamlined solar setup might be all you need to keep your batteries topped off.
Park Smarter to Avoid Shade
Where you park your campervan can make or break your power generation for the day. That shady spot under a big tree might seem perfect for staying cool, but it will completely block your panels from the sun. Even partial shade on one part of your array can significantly reduce the output of the entire system. To get the most from your panels, always try to park in direct sunlight. For an extra edge, especially in the winter, consider installing tilting mounts. Angling your panels directly toward the sun can dramatically increase their efficiency, giving you more power when you need it most.
Get Enough Power for Winter Camping
Winter camping presents the biggest challenge for solar power. The combination of shorter days, a low sun angle, and a higher chance of cloudy weather means your panels will be working at a fraction of their summer capacity. For example, a flat-mounted panel that’s 90% efficient in July might only be 25% efficient in December. This is why it’s so important to have a system designed for four-season travel if you plan to hit the road in the colder months. This often means installing more panels and having a larger battery bank to store enough power to get you through a few overcast days. Preparing your entire RV with a winter readiness service ensures every part of your rig is ready for the cold.
How Do You Maintain Your Solar Panels?
Once your solar system is up and running, you’ll be happy to know that maintenance is pretty simple. Unlike your RV’s engine or chassis, your solar panels don’t have moving parts that wear out. They are designed to withstand the elements and can last for 20 to 25 years with just a little attention. Think of it less like a chore and more like a quick check-in to protect your investment and ensure you’re getting every bit of power you paid for. Keeping them in top shape comes down to a few basic tasks: regular cleaning, inspecting the system for damage, and making sure all your electrical connections are secure.
A simple routine will ensure you’re getting consistent, reliable power for all your off-grid adventures, so you never have to worry about your batteries running low when you need them most. Neglecting them won’t cause an immediate failure, but over time, dirt and loose connections can significantly reduce your power output. This is the last thing you want when you’re miles from the nearest outlet, relying on that power for your lights, fridge, and devices. By spending just a few minutes on maintenance every few months, you can catch small issues before they become big problems, extend the life of your entire system, and travel with complete peace of mind. It’s a small effort that pays off big time in reliability and performance.
Stick to a Simple Cleaning and Inspection Schedule
The most important thing you can do for your solar panels is to keep them clean. Dust, pollen, leaves, and bird droppings can build up over time, blocking sunlight and reducing your system’s efficiency. A quick wash with a soft cloth or sponge, some mild soap, and water is usually all it takes. Try to clean them in the morning or evening when they’re cool to the touch. While you’re up there, do a quick visual check. Look for any cracks, chips, or discoloration on the panels themselves. Also, inspect the mounting hardware to make sure everything is still tight and secure. If you spot any damage, it’s best to get it checked out by a professional. Our team can handle all kinds of RV services and repairs to get you back on the road safely.
Check Connections and Prevent Corrosion
Beyond cleaning, it’s a good idea to periodically check your system’s wiring and connections. Vibrations from the road can sometimes loosen connections over time, which can lead to power loss or create a safety hazard. Make sure all wires are secure and that there are no signs of fraying or damage. It’s also important that your fuses and breakers are the correct size for the amount of electricity flowing through them. Corrosion can also be an issue, especially in humid environments. Check the battery terminals and other connection points for any white, powdery buildup. If you find any, you can clean it off with a wire brush. If you’re not comfortable working with electrical components, don’t hesitate to reach out. Our experts in RV solar solutions can perform a full system checkup for you.
Get the Most Out of Your Panels for Years to Come
To ensure your solar setup performs at its best, it helps to have the right components. One of the most critical parts is the charge controller, which protects your batteries from overcharging. If you want to maximize your power generation, always choose an MPPT (Maximum Power Point Tracking) solar charge controller. An MPPT controller can improve your solar system’s efficiency by up to 30% compared to a standard PWM controller, which is a huge difference on cloudy days. Another way to get more from your panels is to park smart. Whenever possible, position your RV to minimize shade from trees or buildings. If you have tilting mounts, adjusting the angle of your panels to face the sun directly can also make a noticeable difference. With these simple habits, your solar investment will keep powering your travels for years.
What’s the Real Cost of Going Solar?
Let’s talk numbers. Investing in a solar setup for your RV is a big decision, and the price tag is often the first thing on everyone’s mind. The total cost can vary quite a bit, depending on the size of your system, the components you choose, and whether you decide to install it yourself or hire a professional. While there’s an upfront investment, it’s helpful to think of it as paying for freedom. The ability to camp off-grid without a noisy generator, the peace of mind knowing you have reliable power, and the long-term savings on campground fees all add up.
The final cost is a mix of a few key elements: the solar panels, the battery bank to store the power, a charge controller to protect your batteries, and an inverter to convert DC power to AC for your appliances. The good news is that you can build a system that perfectly matches both your budget and your travel style. Whether you’re a weekend warrior who just needs to keep the lights on or a full-timer running multiple electronics, there’s a solar solution that makes sense for you. We’ll break down the main cost factors to help you plan your investment.
Breaking Down Costs by Size and Panel Type
The heart of your system, the solar panels, will be a major part of your budget. For most RVs and campervans, panels typically range from 100 to 400 watts. The price depends on the wattage, the physical size, and the type of panel you choose. Monocrystalline panels, for example, are more efficient and often cost a bit more than polycrystalline ones. Beyond the panels, you’ll need to factor in the cost of batteries, a charge controller, an inverter, and all the necessary wiring and mounting hardware. When you’re pricing out larger panels, don’t forget to check for shipping fees, as they can sometimes add a surprising amount to the total.
DIY vs. Professional Installation: What to Consider
You can definitely save some money by installing your solar system yourself. A DIY approach involves careful planning, mounting the panels, running all the wires, and connecting everything correctly. If you’re handy and comfortable with electrical work, this can be a rewarding project. However, it’s also a complex job where mistakes can be costly or even dangerous. Opting for a professional installation gives you peace of mind. Experts ensure your system is safe, efficient, and installed correctly to withstand the rigors of the road. This way, you can hit the road knowing your power system is reliable and ready for any adventure.
Calculate Your Long-Term Savings
While you’re looking at the initial cost, don’t forget to consider the long-term value. Solar panels are a fantastic investment if you travel often or live in your RV full-time. Every night you spend boondocking instead of paying for a campsite with an electrical hookup is money back in your pocket. Over time, these savings can really add up and offset the initial cost of your system. A great piece of advice is to get a slightly larger system than you think you need. You’ll almost always use more power than you expect, and having that extra capacity means you won’t have to upgrade later.
Related Articles
- RV Solar FAQ
- What Size Solar Panel Do You Need for Your RV Battery
- Can Solar Power Keep Your RV Running? Exploring the Possibilities
- How Many Watts of Solar Power Does My RV Need?
- How to Charge an RV Battery Using a Solar Panel
Frequently Asked Questions
What’s the best type of solar panel for most RVers? For the majority of RV owners, rigid solar panels are the best all-around choice. They offer the highest efficiency and are built to last for decades on the road, giving you the most power for your roof space. While flexible panels are great for unique situations like curved roofs, rigid panels provide the durability and performance needed for a reliable, long-term power system.
Can I start with a small solar setup and expand it later? Yes, you absolutely can. A great way to start is with one or two panels and a battery bank that meets your current needs. The key to making future expansion easy is to buy a charge controller that can handle more power than you initially plan to install. This way, when you’re ready to add more panels, your system’s “brain” is already prepared for the upgrade.
How many cloudy days can my system handle before the batteries run out? This really depends on two things: the size of your battery bank and how much power you use each day. A well-designed system should be able to get you through two to three overcast days without any issues. This is why conducting a thorough “power audit” before you buy anything is so important. Knowing your daily usage helps you build a battery bank with enough reserve power for those less-than-sunny stretches.
Is it really necessary to hire a professional for installation? While a DIY installation can save you money upfront, hiring a professional provides peace of mind. An expert ensures that every connection is safe, all mounting points are completely weatherproof, and your components are matched for optimal performance. Electrical mistakes can be dangerous and roof leaks are costly, so an expert installation protects both you and your investment.
What’s the biggest mistake people make with their first RV solar setup? The most common mistake is underestimating how much battery storage is needed. It’s easy to get excited about the panels themselves, but your battery bank is what actually stores and delivers your power, especially overnight or on cloudy days. Skimping on battery capacity is the quickest way to find yourself without power when you need it most, so always plan for a little more storage than you think you’ll need.
Need Professional RV Service in Denton, TX?
Call (940) 488-5047 — Patriots RV Services, your mission-critical RV service center in Denton, TX.