

That small, discolored spot on your RV ceiling is more than just a cosmetic issue; it’s a warning sign. Left unaddressed, even a tiny leak can lead to saturated insulation, rotted wood, and costly structural damage. Learning how to fix a leaky motorhome roof the right way, right away, is one of the most important skills you can have as an owner. This guide will show you how to effectively tackle minor leaks, helping you protect your investment and prevent a small drip from draining your travel budget. Let’s get your home-on-wheels sealed up and ready for your next adventure.
Key Takeaways
- Regular inspections are key: Most RV roof leaks are caused by gradual wear and failing sealant, so inspecting your roof a few times a year helps you catch small cracks before they turn into big problems.
- Proper prep ensures a lasting fix: A DIY repair will only hold if you start with a clean, dry surface, completely remove the old sealant, and use a patch or sealant that is compatible with your specific roof type.
- Don’t ignore major red flags: If you can’t find the leak’s source, notice soft spots on the roof, or see signs of interior water damage like a sagging ceiling, it’s time to call a professional to avoid serious structural issues.
What Causes RV Roof Leaks?
There’s nothing quite like the sinking feeling of finding a water stain on your RV’s ceiling. A leak can feel like a major disaster, but understanding what causes it is the first step toward a solution. Most leaks don’t just happen overnight. They’re usually the result of a few common culprits that, with a little know-how, you can spot and manage. The main offenders are typically gradual wear and tear from the elements, failing seals around fixtures, and direct impact damage. Knowing what to look for can help you catch a small problem before it turns into a costly repair.
Wear from Age and Weather
Think of your RV roof like the roof on your house; it’s constantly exposed to the elements, and that takes a toll. The sun’s UV rays, driving rain, and fluctuating temperatures all work to break down your roof’s materials over time. Whether you have a rubber, TPO, or fiberglass roof, the material can become brittle, develop cracks, or shrink after years of exposure. This slow degradation is one of the most common causes of leaks, especially in older RVs or those that haven’t had regular maintenance. A well-maintained roof will always last longer, but even the best materials have a lifespan. If you suspect age is catching up with your roof, a professional RV roof repair can prevent small cracks from causing big water damage.
Failing Seals Around Vents and Fixtures
Your RV roof is more than just a flat surface; it’s dotted with vents, an AC unit, skylights, and antennas. Each of these components requires a cutout in the roof, and those openings are protected by a layer of sealant or caulk. This sealant is your first line of defense against water, but it’s also a major weak point. Over time, that flexible sealant dries out, cracks, and pulls away from the fixture and the roof, creating a perfect pathway for rain to get in. A quick visual inspection of these seals a few times a year can save you a massive headache. If you see any cracking or gaps around your vents or your RV AC unit, it’s time to take action.
Impact Damage from Branches or Debris
Sometimes, a leak isn’t from slow degradation but from a sudden, unfortunate event. The classic culprit is a low-hanging tree branch at a campsite that scrapes across your roof as you’re parking. A run-in with hail during a storm or even road debris kicked up on the highway can also easily puncture or tear your roof’s membrane. Unlike slow-forming leaks, this kind of damage is often immediately obvious and can let in a lot of water quickly. Even a tiny puncture can lead to extensive interior damage if it’s not addressed right away. This type of issue often requires a more robust fix than just applying new sealant, sometimes needing professional RV paint and body collision repair to properly patch the membrane and ensure it’s watertight.
How to Find the Source of a Roof Leak
Finding the source of a roof leak can feel like a bit of detective work. Water is tricky; it can enter at one point on your roof and travel along internal structures before it finally drips onto your ceiling. This means the wet spot you see inside might not be directly below the actual breach. Before you can even think about patching things up, you have to play investigator and trace the water back to its origin. Taking the time to pinpoint the exact entry point is the most important step in ensuring your repair will actually work and prevent future headaches. A thorough inspection, both inside and out, will give you the clues you need to solve the mystery.
Check for Clues Inside Your RV
Your first stop is inside your motorhome, where the evidence of a leak is often most obvious. Start by looking for the classic signs of water intrusion. You might see active drips or damp spots on the ceiling, especially after it rains. Pay close attention to any areas that look stained, discolored, or feel soft and spongy to the touch. A sagging ceiling is a serious red flag that indicates water has been pooling for a while. Don’t forget to use your nose, too. A persistent musty odor often points to hidden moisture and potential mold growth. These clues will help you narrow down the general location of the problem before you head outside. If you spot significant staining or sagging, it might be time for a professional RV roof repair.
Inspect the Roof’s Exterior
Once you have a general idea of the leak’s location, it’s time to safely get up on the roof for a closer look. Remember that the entry point on the exterior might be several feet away from where the water is showing up inside. Your main job here is to inspect every seam and seal. Look closely at the sealant around your vents, air conditioning unit, skylights, and antennas. Over time, sealant can become brittle, crack, or pull away, creating a perfect pathway for water. Check for any loose screws or gaps around fixtures. You should also carefully examine the entire roof surface for any punctures or tears. A small crack is all it takes for water to get in. A regular inspection is part of good RV services and repairs and can catch these issues early.
Use Water to Pinpoint the Leak
If a visual inspection doesn’t reveal the exact source, a controlled water test is your next best step. For this, you’ll need a helper. Have one person stay inside the RV to watch for drips while the other person is on the roof with a garden hose. Make sure the roof is completely dry before you begin. Start spraying a small, targeted area with water, beginning downhill from where you suspect the leak is. Isolate one section at a time, like the seal around a single vent. Give it a few minutes before moving to the next spot. The person inside should shout as soon as they see the first drop of water appear. This method lets you confirm the exact entry point so you can focus your repair efforts precisely where they’re needed.
What Tools and Materials Will You Need?
Before you climb up that ladder, gathering all your tools and materials will make the repair process go much more smoothly. Think of it like prepping your ingredients before you start cooking; it saves you from scrambling later. Having everything you need on hand ensures you can do the job right the first time without any interruptions. Let’s walk through exactly what you’ll need to tackle that leak.
Essential Cleaning Supplies
A successful repair starts with a spotless surface. Any dirt, grime, or old, flaky sealant will prevent the new patch from creating a watertight bond. You’ll want to give your roof a thorough cleaning before applying anything new. Grab a bucket, a medium-bristle brush, and a good RV-specific roof cleaner that’s safe for your roof’s material. You’ll also need a plastic putty knife or scraper to gently remove any loose, old caulk. Finally, have plenty of clean rags and access to water to rinse everything down. Make sure the roof is completely dry before you move on.
The Right Sealants and Patches for Your Roof
This is where choosing the right product is key. Not all sealants are created equal, and using the wrong one can cause more damage. First, identify your roof type, whether it’s EPDM rubber, TPO, or fiberglass. For small cracks and resealing around vents, a self-leveling lap sealant is your best friend. For larger gashes, you’ll need a patch kit designed for your specific roof material. If you’re unsure what to use, it’s always better to be safe than sorry. Our team can help you identify the problem and recommend the best course of action for a permanent RV roof repair.
Safety Gear and Basic Tools
Your safety is the top priority. Working on top of an RV requires care, so let’s make sure you’re protected. You’ll need a sturdy ladder that’s placed on level ground, a pair of shoes with good grip, and protective gloves to keep sealant off your hands. Safety glasses are also a good idea to protect your eyes from cleaning agents or debris. For the repair itself, you’ll need a standard caulking gun for the sealant tube, a utility knife to open the tube and trim patches, and a few extra rags for quick clean-ups. Having these tools within reach will make the job much simpler.
How to Fix a Leaky RV Roof: A Step-by-Step Guide
Once you’ve found the leak and gathered your supplies, you’re ready to get to work. This guide will walk you through the basic steps for a DIY roof repair. Remember, these steps are for minor leaks and patch jobs. If you uncover widespread damage or feel unsure at any point, it’s always best to call in a professional.
Step 1: Clean and Prep the Roof Surface
You can’t get a good seal on a dirty roof. The first step is to thoroughly clean the area around the leak. Start by sweeping away any leaves and loose debris. Then, using a stiff brush and an RV-safe cleaner, scrub the surface to remove dirt, grime, and mildew. For stubborn spots, you can use a power washer on a low setting, but be careful not to damage the roofing material. Once the area is clean, carefully scrape away any old, loose, or crumbling caulk to create a smooth surface for the new sealant to stick to. A clean roof is essential for a lasting repair.
Step 2: Remove Old Sealant and Debris
With the surface clean, your next focus is removing the failed sealant. Using a plastic putty knife or scraper, gently work to lift and peel away any old sealant that is cracked, peeling, or pulling away from the roof. The key is to be gentle and patient. You want to avoid gouging or tearing the delicate roof membrane underneath. Your goal is to create a clean, solid foundation for the new patch or sealant. If you remove the old sealant and find the damage is more extensive than you thought, it might be time to consider a professional RV roof repair.
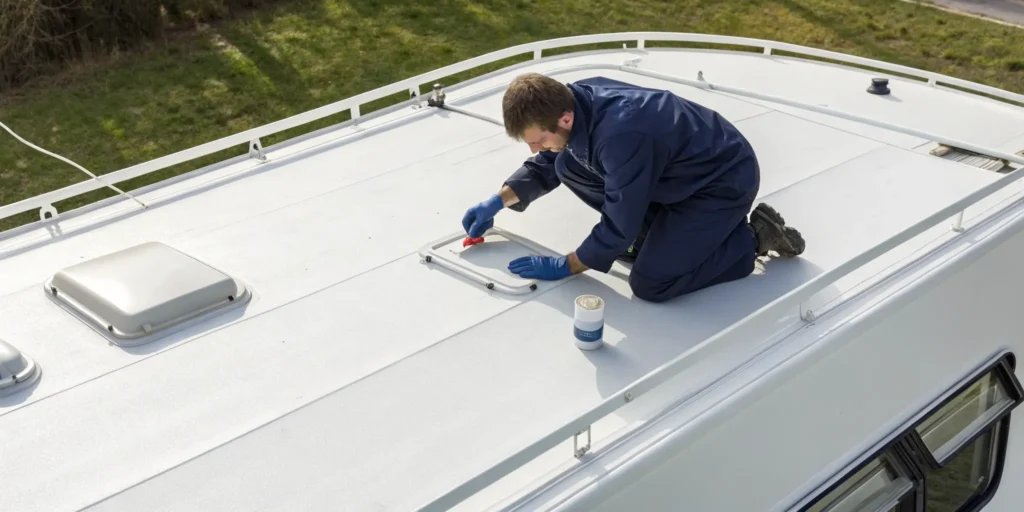
Step 3: Apply New Sealant and Patches
Now it’s time to seal the deal. For small cracks or gaps around vents and seams, apply a generous bead of self-leveling RV lap sealant. This type of sealant is designed to spread out and fill gaps on its own, creating a waterproof barrier. For larger tears or holes, you’ll need a patch kit. It is critical to use a patch that matches your roof material, whether it’s rubber, TPO, or fiberglass. Follow the kit’s instructions carefully, which usually involve applying an adhesive and pressing the patch firmly in place. Make sure the patch extends well beyond the damaged area on all sides.
Step 4: Let It Cure and Test Your Repair
Patience is key for this final step. Your new sealant or patch needs time to cure and form a strong, waterproof bond. Most products require 24 to 48 hours to dry completely, but always check the manufacturer’s instructions for specific times. Try to keep your RV out of the rain during this period. Once it’s fully cured, you can test your work. Use a garden hose to gently run water over the repaired area for several minutes, then check inside for any signs of moisture. If it’s dry, you’ve successfully fixed the leak. If not, the leak may be more complex and require expert RV services and repairs.
When to Call a Professional for Roof Repairs
Tackling a DIY repair can be satisfying, but it’s crucial to know when a project is better left to the experts. With your RV’s roof, a small mistake can lead to bigger, more expensive problems. Recognizing the signs that you need professional help will save you time, money, and stress. If you’re on the fence about a repair, here are a few things to consider.
Signs the Damage Is Too Big for a DIY Fix
Sometimes, the problem is just bigger than a tube of sealant. If you’ve searched everywhere and still can’t find the source of the leak, it’s time to call a pro. They have the tools to find hidden leaks. Other red flags include widespread damage or signs of water damage inside your RV, like stained ceilings or mold. If your previous DIY patch failed to stop the leak, that’s another clear signal that a more comprehensive solution is needed. An expert can provide a thorough RV roof repair that addresses the root cause, not just the symptom.
When Safety or Structure Is a Concern
A leaky roof is more than an annoyance; it can threaten your RV’s structural integrity. Water can saturate insulation, rot the wooden framework, and cause electrical shorts. The longer a leak goes, the more costly the damage becomes. If you notice a sagging ceiling, soft spots on the roof, or delamination on the walls, these are signs of potential structural issues. Don’t risk your safety or your rig’s long-term health. Getting professional RV services and repairs ensures your home-on-wheels remains a safe travel companion.
How to Prevent Future Leaks
The best way to deal with a leak is to prevent it. Regular maintenance is your first line of defense. Make it a habit to clean your roof and inspect the seals around vents, the AC, and antennas. Look for cracks, gaps, or sealant that is pulling away. While you can handle these checks yourself, a professional annual inspection can catch problems you might miss. A professional RV washing and detailing not only keeps your rig looking great but also gives a trained eye a chance to spot early signs of wear on your roof.
Related Articles
- How to Repair RV Roof Leak: Quick and Easy Solutions – Patriots RV Services
- How to Repair Leaking RV Roof and Prevent Future Damage – Patriots RV Services
- Patriots RV roof cost guide – Patriots RV Services
- How to Repair RV Roof Membrane: Easy DIY Solutions – Patriots RV Services
- How to Repair Tear in RV Roof: Quick and Easy Fixes – Patriots RV Services
Frequently Asked Questions
How often should I inspect my RV roof for potential leaks? A good rule of thumb is to give your roof a thorough visual inspection at least twice a year, ideally in the spring and fall. It’s also smart to check it after any long trip or before putting your RV into storage. A quick look at the seals around your vents and AC unit after a heavy storm can also help you catch any new problems right away.
Can I just use regular silicone caulk from the hardware store for my roof? I strongly advise against it. While it might seem like a quick fix, household silicone caulk doesn’t bond well with the materials used for RV roofing, like TPO or EPDM rubber. It can peel away quickly and may even damage the roof membrane, making the problem worse. Always use a self-leveling lap sealant specifically designed for RVs to ensure a durable, waterproof seal.
What’s the difference between using a patch and just applying more sealant? Sealant is best for maintaining the seams around fixtures like vents, skylights, and the edges of your roof. It’s for reinforcing existing seals or filling very small cracks. A patch, on the other hand, is designed to repair an actual hole, tear, or puncture in the main surface of the roof membrane. Think of sealant as maintenance and a patch as a direct repair for physical damage.
Is a small water stain on my ceiling a big deal if it’s not actively dripping? Yes, you should treat any water stain as a serious issue. That stain is evidence that water has already penetrated your roof and ceiling. Even if it’s not dripping, the moisture is likely trapped in your roof’s insulation and wood structure, which can lead to rot and mold over time. It’s a clear sign that you need to find and fix the source of the leak immediately.
My roof has a lot of cracks and looks worn out. Is it better to keep patching it or just replace it? If you’re constantly chasing down new cracks and the roof material itself feels brittle or looks chalky, you may be fighting a losing battle. While patching can work for isolated issues, a roof that is failing due to age will continue to develop new problems. In this situation, a full roof replacement is often the more reliable and cost-effective solution in the long run, giving you peace of mind for years to come.
Need Professional RV Service in Denton, TX?
Call (940) 488-5047 — Patriots RV Services, your mission-critical RV service center in Denton, TX.