

How to Repair RV Roof Membrane: Easy DIY Solutions
Start by examining your RV roof membrane for any tears, cracks, or bubbling that need attention. Whether you’re a DIY enthusiast or planning to visit a leading RV service center, you’ll want to have RV Roof Repair Tape, Rubber Roof Sealant, and cleaning supplies on hand. Clean the roof completely before beginning any repairs. Apply your repair solution carefully, paying close attention to detail. For the best results with sealant application, make sure you’re working with a clean, dry surface and spread the sealant evenly. Cover all damaged areas completely to create a strong, lasting bond. These steps will help you achieve a successful RV roof membrane repair.
Identifying the Roof Membrane Damage
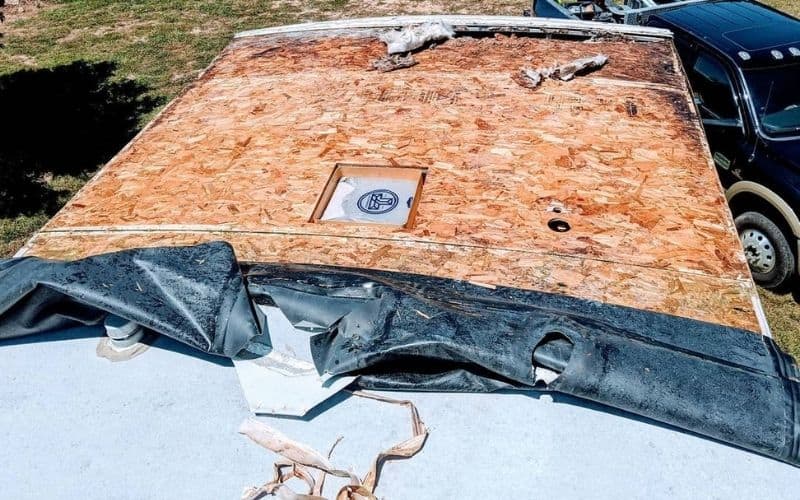
To identify roof membrane damage on your RV, start by closely inspecting the surface for any signs of tears, cracks, or bubbling. These issues can indicate fundamental problems that need attention. Look for tears in the membrane that expose the substructure underneath. Cracks may appear as lines on the surface and could worsen if not addressed promptly. Bubbling or blistering can signal trapped moisture, potentially leading to more extensive damage if left unchecked. Pay close attention to seams and edges where damage often begins. Inspecting your RV roof regularly or scheduling a trusted RV mobile service will help catch these issues early. Understanding the signs of roof membrane damage is essential for maintaining the integrity of your RV’s roof and supports proactive RV repair and service for a safe and enjoyable travel experience.
Gathering the Necessary Materials
Inspecting the RV roof membrane for damage has revealed necessary repairs, and now it’s time to gather the essential materials for the job. Making sure you have the correct supplies is vital for a successful RV roof repair. Here are the materials you will need:
– RV Roof Repair Tape: High-quality, waterproof tape designed specifically for RV roof repairs.
– Rubber Roof Sealant: A durable sealant that adheres well to the roof membrane material.
– Cleaning Solution: A mild cleaner to prepare the roof surface for repair.
– Paint Brush or Roller: For applying the sealant evenly over the damaged areas.
– Protective Gear: Gloves, safety glasses, and appropriate clothing to guarantee your safety during the repair process.
Preparing the Roof Surface
Before proceeding with the repair, it is vital to thoroughly clean the roof surface to guarantee proper adhesion of the sealant and repair materials. Begin by removing any debris, dirt, or loose particles using a broom or a vacuum cleaner. Next, wash the roof with a solution of water and mild detergent to eliminate any grime or residue. Rinse the surface thoroughly and allow it to dry completely before moving on to the repair stage. Inspect the roof carefully for any signs of damage or areas that may need special attention. Properly preparing the roof surface is crucial as it ensures the effectiveness and longevity of the repair, providing a solid foundation for the upcoming steps in the process.
Applying the Repair Solution
We apply the repair solution using a steady and even hand to ensure comprehensive coverage and proper sealing of the damaged area. It’s essential to follow these steps for a successful repair:
– Begin at one corner and work systematically across the damaged section.
– Use a brush or roller to make sure the solution is evenly spread.
– Pay close attention to edges and seams to avoid any gaps.
– Apply multiple coats if needed, allowing each layer to dry completely.
– Smooth out any bubbles or uneven areas for a seamless finish.
Ensuring Proper Sealant Application
To attain a successful repair, proper sealant application is essential in guaranteeing long-lasting protection for the RV roof membrane. When applying sealant, it’s vital to start with a clean and dry surface. Remove any debris or old sealant that might impede adhesion. Using a caulking gun, apply the sealant evenly along seams, edges, and any areas of concern. Make sure to cover the damaged area entirely, overlapping onto the surrounding membrane to create a strong bond. Smooth out the sealant with a putty knife or your finger to ensure no air bubbles or gaps are present. Allow the sealant to cure fully according to the manufacturer’s instructions before exposing it to any weather conditions. Remember, a meticulous sealant application is essential for a successful RV roof membrane repair.
Related Topics:
- How to Repair RV Roof Leak: Quick and Easy Solutions
- How to Paint RV Walls: Tips for a Smooth and Durable Finish