

The thought of getting on top of your rig to perform maintenance can feel a little intimidating, but sealing your roof is a project you can absolutely handle. With the right preparation and a clear set of instructions, you can create a watertight barrier that protects your RV for years to come. This isn’t just about patching a leak; it’s about proactive care that stops problems before they start. We’ve created this step-by-step tutorial to demystify the process of how to seal a motorhome roof. We’ll show you which tools you need, how to avoid common mistakes, and the techniques for a clean, effective application.
Key Takeaways
- Proactive sealing is your best defense: Regularly inspecting and sealing your RV roof is the most effective way to prevent costly water damage. This simple maintenance protects your entire investment by stopping leaks before they can cause structural rot or mold.
- Success starts with the right prep and product: A durable, waterproof seal depends on two key factors: a thoroughly cleaned surface and the correct sealant. Always remove old, failing caulk and choose a product specifically compatible with your roof material, whether it’s EPDM, TPO, or fiberglass.
- Plan your project around the forecast: Weather has a huge impact on your results. Apply sealant on a clear, dry day with moderate temperatures and allow at least 24 to 48 hours for it to cure fully without interference from rain or extreme heat.
Why Is Sealing Your RV Roof So Important?
Think of your RV’s roof as its first line of defense against the elements. It takes a beating from the Texas sun, heavy rains, and everything in between. Over time, the original seals around vents, air conditioners, and edges can crack and wear down, creating tiny openings for water to sneak in. Sealing your roof is one of the most critical pieces of preventative maintenance you can do. It’s a relatively small task that helps you avoid some of the biggest and most expensive problems an RV owner can face. By regularly inspecting and resealing your roof, you’re not just protecting the top of your rig; you’re safeguarding your entire investment and ensuring it’s ready for your next adventure.
Prevent Costly Water Damage
The number one reason to keep your RV roof sealed is to prevent water damage. Even a small leak can lead to a cascade of problems, including wood rot, delamination, and mold growth, which can be incredibly difficult and expensive to fix. A proper seal acts as a barrier, protecting your RV from rain, sun, dirt, and bugs. When you don’t take care of your roof, you’re leaving your motorhome vulnerable to issues that can shorten its lifespan. If you find a leak, getting a professional RV roof repair is the best way to stop the damage before it spreads and protect the structural integrity of your vehicle.
Extend the Life of Your RV
Regular roof maintenance does more than just stop leaks; it extends the life of your entire RV. A new coating protects the roof membrane from UV damage, which can cause it to become brittle and crack over time. This simple step keeps your RV more comfortable by stopping drafts and helps you avoid major repair bills down the road. A high-quality roof coating can last for years if it’s applied correctly and maintained properly. By investing a little time in your roof now, you’re ensuring you and your family can enjoy your RV for many more years of travel and exploration.
Save Money with Simple Maintenance
It’s always cheaper to prevent a problem than to fix one. Proactive maintenance, like sealing your roof, costs far less than waiting for significant damage to occur. The cost of sealant and a few hours of your time is minimal compared to the thousands you could spend on structural repairs from a long-term leak. Depending on the climate and conditions you travel in, most experts recommend resealing your roof every two to four years to keep it in top shape. Staying on top of simple RV services and repairs like this is the smartest way to protect your investment and keep more money in your pocket for the fun parts of RVing.
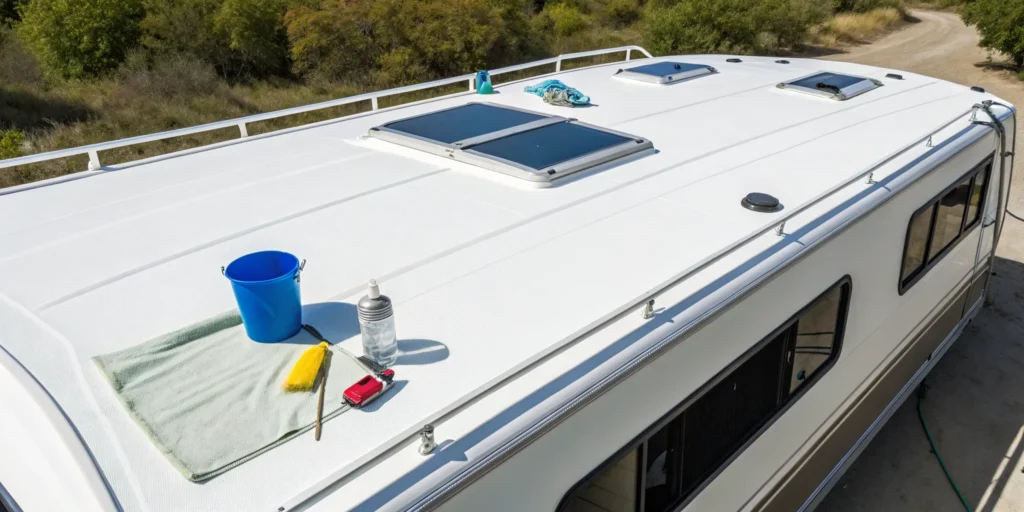
Gather Your Roof Sealing Materials and Tools
Before you climb that ladder, let’s talk about prep. Having all your materials and tools ready to go makes the entire process smoother and safer. Think of it like gathering your ingredients before you start cooking; it prevents those frantic mid-project runs to the store. A little organization now will save you a lot of hassle later and help you get a professional-quality seal that lasts. Let’s walk through exactly what you’ll need to get the job done right.
The Right Sealant for Your Roof Type
Choosing the right sealant is the most critical step. The type you need depends entirely on what your RV roof is made of. Most modern RVs have rubber roofs (either EPDM or TPO), but older models might have fiberglass or metal. Using the wrong product can do more harm than good, so always double-check the sealant’s label to confirm it’s compatible with your roof material. Look for a high-quality sealant that offers UV protection and flexibility to withstand temperature changes and movement. When in doubt, a professional RV roof repair service can help you identify your roof type and select the perfect sealant.
Essential Tools and Equipment
You don’t need a professional workshop, but a few key tools are essential for a clean application. Start with your cleaning supplies: a bucket, soap or a specialized RV roof cleaner, and some scrub brushes and rags. To remove the old sealant, you’ll want a plastic putty knife or scraper. For applying the new sealant, a standard caulking gun is a must. If you find you need more than just a simple reseal, our team handles all types of RV services and repairs. When you apply the bead of sealant, hold the gun at a 45-degree angle and move it in a slow, steady motion for an even line.
Safety Gear You Shouldn’t Skip
Working on an RV roof requires putting safety first. At a minimum, you should wear non-slip shoes to ensure good footing. It’s also a great idea to wear safety glasses to protect your eyes from cleaning agents or sealant, and gloves to keep your hands clean and protected from chemicals. Always read the safety recommendations on your sealant’s packaging. If you’re not comfortable working at heights or with these materials, remember that our expert team is always here to help. Taking a few extra moments to gear up properly helps prevent accidents and ensures your DIY project is a success.
How to Prep Your RV Roof for Sealing
Before you even think about opening a tube of sealant, you need to get your RV roof ready. Proper preparation is the single most important factor in getting a durable, long-lasting seal that will protect your investment. Rushing this stage can lead to a weak bond, trapping moisture and causing the very problems you’re trying to prevent. Think of it like painting a wall; you wouldn’t just slap a new coat over dirt and peeling paint. Taking the time to clean, inspect, and prep the surface ensures the sealant can do its job effectively, giving you peace of mind on your next adventure.
Clean the Roof Thoroughly
First things first, your roof needs a deep clean. Over time, it collects a surprising amount of dirt, sap, and road grime that can prevent a new sealant from adhering properly. Start by sweeping off any loose debris like leaves and twigs. Then, using an RV-safe cleaner and a soft-bristle brush, scrub the entire surface. The cleanliness of your roof directly impacts how well the sealant adheres, so don’t cut corners here. If the job feels too big or you lack the right supplies, consider a professional RV washing and detailing service to get the perfect starting surface.
Inspect for Damage and Wear
Once the roof is clean, it’s time for a close inspection. With a clear view of the surface, you can spot potential problems that were hiding under the dirt. Look for any cracks, bubbles, tears, or soft spots in the roof membrane, as these could be signs of underlying water damage. Neglecting a thorough roof inspection before applying a coating can lead to significant issues down the road. Pay special attention to the existing sealant around vents, skylights, and antennas. If you find extensive damage or are unsure about what you’re seeing, it’s best to pause the DIY project and consult with an expert about RV roof repair.
Remove Old, Cracked Sealant
If the existing sealant is cracked, peeling, or pulling away from the roof, it has to go. Applying new sealant over old, failing material is a recipe for leaks. Use a plastic putty knife or a specialized sealant removal tool to gently scrape away the old stuff. Be careful not to gouge or tear the roof membrane underneath. The goal is to create a clean, smooth surface for the new sealant to bond with. Remember, any remaining dirt, grease, or old material will prevent the new coating from adhering properly. This step requires patience, but it’s absolutely essential for a watertight finish.
Make Sure the Surface Is Completely Dry
After all the cleaning and scraping, the final prep step is to ensure the roof is completely bone-dry. Any trapped moisture will compromise the sealant’s bond and can lead to mold growth. Let the roof air-dry thoroughly, and use a clean cloth to wipe away any remaining damp spots, especially around seams and fixtures. It’s best to do this work on a clear, low-humidity day and allow several hours for drying. A dry surface is critical for proper adhesion and long-lasting results. Once you’re confident the roof is dry, you’re finally ready to start sealing.
How to Choose the Right Sealant for Your Roof
Walking down the sealant aisle can feel overwhelming, with dozens of tubes and tubs all promising a perfect, waterproof seal. But here’s the secret: not all sealants are created equal, and the best one for your RV depends entirely on what your roof is made of. Using the wrong product is a common mistake that can cause serious damage, from degrading the roof membrane to failing to create a proper bond, which leads right back to leaks. It’s a bit like using the wrong skincare for your skin type; you won’t get the results you want and might even make things worse.
Before you buy anything, your first step is to identify your roof material. Most modern RVs have either EPDM or TPO rubber roofs, but older models might have fiberglass or aluminum. Not sure what you have? Your owner’s manual is the best place to check. Once you know your roof type, you can confidently select a compatible sealant that will offer durable, flexible, and long-lasting protection. This guide will break down the best options for each material, helping you get the job done right the first time. And if you find yourself staring at your roof with more questions than answers, remember that professional RV roof repair is always an option.
Sealants for EPDM Rubber Roofs
EPDM rubber roofs are very common, but they’re also sensitive to certain chemicals. It’s crucial to use a sealant specifically designed for EPDM or rubber roofing. Using a generic silicone or a product with petroleum distillates can cause the rubber membrane to swell, bubble, and break down over time, creating a bigger problem than the one you started with. Look for products clearly labeled as compatible with EPDM. For the best long-term protection, a liquid sealant is generally a better choice than tape, as it creates a more seamless and durable barrier against the elements. Always double-check the product description to ensure it’s the right match for your roof.
Options for TPO and Vinyl Roofs
TPO and vinyl roofs are another popular choice for RVs, known for their durability and resistance to mold. Like EPDM, these materials require a compatible sealant to ensure a strong, lasting bond. When you’re shopping for a sealant, make sure the product specifies it’s safe for TPO or vinyl. A key feature to look for is UV protection. Your RV roof is constantly exposed to the sun, and a sealant with built-in UV inhibitors will prevent the material from becoming brittle and cracking over time. This helps maintain the integrity of both the seal and the roof itself, keeping you protected on all your adventures.
Solutions for Metal and Fiberglass Roofs
If you have an older RV or a model with a hard-sided roof, you’re likely dealing with aluminum or fiberglass. These materials are rigid and don’t have the same flexibility as rubber roofs, so they need a different type of sealant. Urethane-based or self-leveling lap sealants are excellent choices for the seams, vents, and edges on metal and fiberglass roofs. These products are designed to adhere strongly to non-porous surfaces and can withstand the expansion and contraction that happens with temperature changes without cracking. Avoid using sealants meant for rubber roofs, as they may not bond properly to a hard surface.
Check for Material Compatibility
If there’s one takeaway here, it’s this: always check for compatibility. Before applying anything to your roof, read the sealant’s label and technical data sheet carefully. The manufacturer will clearly state which materials the product is designed for. Look for key features like flexibility, water resistance, and UV protection to ensure you’re getting a high-quality product that will perform well. If you’re not 100% sure what your roof is made of, consult your owner’s manual or contact a professional. Guessing is not worth the risk of a failed seal and potential water damage. Our team can help you identify your roof type and recommend the perfect solution for a lasting RV roof repair.
Your Step-by-Step Guide to Sealing an RV Roof
Okay, you’ve cleaned, inspected, and prepped your roof. Now for the main event: applying the sealant. This is where your hard work really pays off, creating a tough, waterproof barrier that protects your home-on-wheels from the elements. Don’t rush this part. Taking your time to apply the sealant correctly will save you from dealing with frustrating leaks and expensive water damage down the road. Grab your sealant and tools, and let’s walk through the process step-by-step to get a professional-quality finish. Whether you’re doing a quick touch-up or a full recoat, these steps will guide you to a perfectly sealed roof.
Start with Vents, ACs, and Fixtures
First things first, focus on the areas where things stick out of your roof. Your vents, AC unit, skylights, and antennas are the most common culprits for leaks because they interrupt the smooth surface of the roof. Using your caulk gun, apply a generous, continuous bead of self-leveling lap sealant around the base of each fixture. You want to completely cover the old screws and the edge of the fixture’s flange. The goal is to create a seamless, waterproof gasket. Don’t be shy with the sealant here; a thick application ensures that any tiny gaps are filled, which is key to preventing water intrusion.
Seal All Edges and Seams
Once all your fixtures are sealed, it’s time to move on to the perimeter of the roof. Carefully inspect and seal all the edges and seams where the roofing material meets the side walls of your RV. This includes the front and rear caps. Apply a steady bead of sealant along these long seams, making sure it overlaps onto both the roof material and the trim. A continuous, unbroken line is crucial for creating a solid barrier against rain and moisture. If you find any gaps or cracks in the existing sealant during your inspection, make sure you cover them completely with a fresh layer.
Apply the Sealant to the Entire Roof
If you’re just touching up spots, you can skip this step. But for older roofs showing signs of chalking, cracking, or widespread wear, a full roof coating is your best bet. This process involves rolling on a liquid roof sealant over the entire surface. Think of it like painting a room. Start at one end and work your way back, applying a thin, even coat with a medium-nap roller. Most manufacturers recommend at least two coats for maximum durability and protection. Always let the first coat dry completely according to the product’s instructions before applying the second. This step is a bigger job, but it essentially gives you a brand-new roof surface. For a project this extensive, getting a professional opinion on your RV roof repair can ensure it’s done right.
Aim for a Smooth, Even Coat
Whether you’re applying sealant from a tube or rolling on a coating, a smooth finish is important. It not only looks better but also helps water run off properly instead of pooling in low spots. For lap sealant around fixtures, you can gently smooth the bead with a gloved finger dipped in mineral spirits to prevent sticking. When rolling on a full coating, use consistent pressure and overlap your strokes to avoid lines and uneven patches. A smooth, uniform layer provides the most effective and long-lasting protection. Taking a little extra care here makes a huge difference in the final result and the overall longevity of your roof.
When Is the Best Time to Seal Your Roof?
Timing is everything when it comes to sealing your RV roof. This isn’t a project you can squeeze in whenever you have a spare hour. The weather plays a massive role in how well the sealant adheres and cures, directly impacting the quality and longevity of your work. Applying sealant under the wrong conditions can lead to a weak bond, bubbles, or a complete failure of the seal, forcing you to start all over again.
To get a durable, waterproof finish, you need to plan around the forecast. The key is to find a clear window of a few days with the right temperature and low humidity. This gives the sealant enough time to dry and cure properly without interference from rain or extreme temperatures. Think of it as giving your RV’s new protective layer the best possible start in life.
Ideal Temperature and Humidity
For the best results, you’ll want to apply sealant on a warm, dry day. Moderate temperatures and low humidity are your best friends for this project. These conditions allow the sealant to stick to the roof surface correctly and cure at a steady pace. If it’s too cold, the sealant can become too thick to apply evenly, and it may not bond properly. If it’s too humid, the moisture in the air can significantly slow down the curing process and compromise the final seal. Aim for a clear, mild day to ensure your hard work pays off with a long-lasting, protective coat.
Why You Should Avoid Rain and Extreme Heat
It’s critical to choose a dry day for this job because most sealants need up to 48 hours to dry completely. An unexpected rain shower can wash away the fresh sealant or trap moisture underneath, which is a recipe for future leaks and water damage. On the other end of the spectrum, extreme heat, especially the kind we see in a Texas summer, can cause the sealant to dry too quickly on the surface. This can lead to cracking or prevent it from bonding correctly to the roof material. If you’re dealing with persistent leaks, it’s always a good idea to get a professional RV roof repair to ensure the job is done right.
Understand Drying and Curing Times
Patience is a virtue, especially when it comes to letting your new roof seal set. It’s important to understand the difference between drying and curing. A sealant might feel dry to the touch within a few hours, but it can take 24 to 48 hours, or even longer, to fully cure. Curing is the chemical process where the sealant hardens completely and forms its strongest, most durable bond. Always check the product’s instructions for specific timeframes. Moving your RV or exposing it to the elements before it has fully cured can undo all your hard work, so plan to keep it parked for a couple of days.
How to Maintain Your Newly Sealed Roof
You’ve put in the work to seal your motorhome roof, which is a huge step in protecting your investment. But the job isn’t quite done. To get the most out of your new sealant and prevent future headaches, a little regular maintenance goes a long way. By staying proactive, you can catch small issues before they turn into major, expensive problems. A well-maintained roof seal is your first line of defense against water damage. Here’s how to keep your newly sealed roof in top condition.
Set a Regular Inspection Schedule
Consistency is key for roof maintenance. Plan to inspect your roof at least twice a year, perhaps in the spring and fall. It’s also smart to check it after any major weather events, like a big Texas thunderstorm. During your inspection, look for new cracks, peeling, or signs of wear on the sealant. In areas with intense sun, you might even consider a full reseal every couple of years. Catching a small problem early is the easiest way to handle an RV roof repair before it becomes a major project.
Know the Warning Signs for Resealing
Knowing what to look for makes all the difference. The first sign of a roof leak isn’t always a drip from the ceiling. You might notice a musty smell, like damp newspaper, which can signal hidden mildew. Keep an eye out for other clues inside your RV, such as peeling wallpaper, dark streaks on the walls, or damp spots in cabinets. On the roof itself, check for rust on metal components. Ignoring these signs can lead to serious damage, so if you spot any, it’s time to investigate and consider professional RV services and repairs.
Protect Your Roof from Sun Damage
The sun can be just as tough on your RV roof as rain. Prolonged UV exposure causes sealants to break down and become brittle. To protect your newly sealed roof, try to park in the shade whenever possible. If that isn’t an option, investing in a quality RV cover that blocks UV rays is a great alternative. This simple step extends the life of your sealant and helps keep your RV cooler. A clean roof is also a protected roof, so regular RV washing and detailing helps prevent dirt from degrading the surface over time.
Common Roof Sealing Mistakes to Avoid
Sealing your RV roof is one of the most important maintenance tasks you can tackle. When done right, it protects your home-on-wheels from the elements and prevents serious issues down the road. But a few common mistakes can undermine all your hard work, leading to a weak seal that fails much sooner than it should.
Getting a durable, watertight finish is all about avoiding the easy-to-make errors that trip up many DIYers. From preparing the surface to picking the right day for the job, every step matters. Let’s walk through the most frequent missteps so you can get a professional-quality result that lasts. If you run into trouble, remember that a professional RV roof repair is always an option.
Rushing the Prep Work
It’s tempting to jump straight to applying the sealant, but skipping the prep work is a critical mistake. The cleanliness of your roof directly impacts how well the new coating will stick. Any dirt, old sealant residue, or grime left on the surface will prevent the new sealant from forming a strong bond, which can lead to leaks and premature failure. Taking the time to thoroughly clean and dry the roof is the single most important thing you can do to ensure a long-lasting seal. Think of it this way: that extra hour spent on prep saves you from having to redo the entire job in just a few months.
Choosing the Wrong Sealant
Walking into a store and grabbing the first tube of sealant you see is a recipe for trouble. RV roofs are made from different materials, like EPDM, TPO, fiberglass, or metal, and each one requires a specific type of sealant. Using a product that isn’t compatible with your roof can cause it to peel, crack, or never cure properly, leaving you with a bigger mess than you started with. Always confirm your roof’s material before you buy anything. You can usually find this information in your owner’s manual. Choosing the right product ensures your hard work pays off with a durable, protective finish.
Ignoring the Weather Forecast
Your new sealant needs time to cure, and the weather plays a huge role in that process. Applying a coating in direct, intense sunlight can cause it to dry too quickly and crack, while high humidity or incoming rain can ruin the application completely. Before you start, check the forecast for the next 24 to 48 hours. You’re looking for a clear, dry day with moderate temperatures, which will give the sealant the ideal conditions to set and form a solid, waterproof barrier. A quick look at the weather app is a simple step that can save you from a frustrating and costly do-over.
When to Call a Professional for Help
If You Suspect Major Damage
Tackling your own RV maintenance can be incredibly rewarding, but it’s just as important to know when to pass the torch to a professional. If you notice signs of significant trouble up top, it’s time to make that call. I’m talking about things like soft spots you can feel when you walk on the roof, large tears, or widespread cracking that looks like a dry riverbed. These are red flags for deeper issues. If the roof is badly damaged, it might need to be replaced entirely. Ignoring these problems won’t make them go away; it just invites more serious issues like wood rot and mold. A professional can give you an accurate diagnosis and perform the right RV roof repair to keep your rig safe and sound.
For a Guaranteed, Long-Lasting Fix
While many common roof problems like small leaks or cracks can be fixed with good sealants, a DIY job might just be a temporary patch. If you’re looking for a solution that lasts for years, not just a season, a professional is your best bet. They bring experience, specialized tools, and access to commercial-grade products that you can’t always find on a store shelf. More importantly, a reputable service provider often guarantees their work, which is a core part of professional RV services and repairs. This gives you peace of mind knowing that your investment is protected. Think of it as the difference between a quick fix and a long-term solution that lets you focus on planning your next adventure, not worrying about the next rainstorm.
How Patriots RV Services Can Help
Even with the best intentions, it’s easy to miss a step or use the wrong product when sealing your own roof. Neglecting a thorough roof inspection and preparation before applying a coating can lead to significant issues down the road, like peeling or bubbling that leaves your roof vulnerable. Our team at Patriots RV Services takes the guesswork out of the equation. We start with a detailed inspection to catch any hidden problems and perform meticulous prep work to ensure a perfect bond. We know exactly which products work best for every type of roof material. From a simple reseal to a full lifetime roof installation, we have the expertise to protect your home on wheels for the long haul.
Related Articles
- How to Seal RV Roof: Quick Tips for Easy DIY Maintenance
- How Often Should an RV Roof Be Resealed
- How to Repair Leaking RV Roof and Prevent Future Damage
- How to Repair RV Roof Membrane: Easy DIY Solutions
- How to Protect RV Roof and Extend Its Lifespan
Frequently Asked Questions
How often should I reseal my RV roof? There isn’t a single magic number, as it really depends on your RV’s exposure to the elements. A good practice is to inspect your roof seals twice a year, typically in the spring and fall. As for a full reseal, most experts suggest doing it every two to four years. If your RV spends most of its time under the intense Texas sun, you’ll probably want to stick closer to the two-year mark to stay ahead of any potential cracking.
What’s the biggest mistake people make when sealing their own roof? By far, the most common mistake is rushing the prep work. It’s tempting to just get the new sealant on, but applying it over a dirty or damp surface is a recipe for failure. The new sealant simply won’t form a strong, lasting bond if there’s any grime or old material in the way. Taking that extra time to thoroughly clean, scrape, and dry the surface is the most important step for a successful seal.
Can I just put new sealant over the old, cracked stuff? I would strongly advise against it. Applying a new layer of sealant over old, failing material won’t fix the original problem. The old sealant has already lost its integrity, so it can’t provide a stable foundation for the new coat. This often traps moisture and dirt underneath, which can make leaks even worse. You really need to remove the old sealant to create a clean surface for the new product to adhere to properly.
What should I do if I find a soft spot on my roof? If you’re on your roof and feel a spongy or soft area under your feet, that’s a sign to stop immediately and get down carefully. A soft spot is a serious red flag for water damage that has likely compromised the wood structure beneath the roof membrane. This is more than a simple sealing job; it’s a structural issue that needs a professional evaluation to prevent further damage.
Is a full roof coating different from just sealing the seams? Yes, they are two different approaches to roof maintenance. Sealing the seams is a targeted touch-up where you apply sealant around fixtures like vents, skylights, and along the edges of the roof. A full roof coating is a much larger project where you apply a liquid sealant over the entire roof surface, essentially creating a brand-new protective membrane. A full coating is usually necessary when the original roof material shows widespread aging, like chalking or fine cracks.
Need Professional RV Service in Denton, TX?
Call (940) 488-5047 — Patriots RV Services, your mission-critical RV service center in Denton, TX.